
Do you want or wish to learn how to start a blog?
Starting a blog is not that complicated at all, and I’m here to assure you that setting up and create your own blog is not as daunting as you may think.
In short, by following the step by step instructions in this book you will be able to create your own blog in less no time (no technical skills required).
The 7 very easy steps to create your own blog:
Definition of blog
Many people still don’t know what blog is? A blog is known as many things—a diary, a digital magazine, collector’s meeting place, newscast, a showcase for your art, teaching hub, information sharing, a place to learn and…well, almost anything you like it to be.
A typical blog combines text, videos, images, and links to relevant pages and media on the internet or Web. Blog readers can leave comments and communicate with the publisher or the author. In fact, interaction and dialogue are a popular part of a blog’s success.
#1 Step: Select a nice and perfect niche
#2 Step: Choose a platform for your blog
#3 Step: Pick a good domain name
#4 Step: Get a web or blog hosting account
#5 Step: Install blogging software and create your own blog
#6 Step: Find the right theme for your blog
#7 Step: Write blog content, articles to published
Introduction and most common questions
Before you delve into action steps, let us cover most of the valuable information. This section provides you with background information to enable you understand why people go into blogging and the most frequent and common questions newbie bloggers ask.
Why create your own blog?
#1. Become a better thinker and writer.
Once you start blogging, you are going to find yourself becoming a better thinker and writer. Content mastering takes creative thought. When you become immersed in creating good pieces of content for your blog, your thinking, your writing, and your research skills will definitely improve in the process.
#2. Establish yourself as an expert
Blogs are great tools to enable people establish themselves as experts in a niche or field. We all have some kind of expertise and interest to share with others. If you are able to produce great content and or you have a unique point of view on a topic.
Then be assured that your future audience or reader will recognize it and you will be rewarded for it. With a little bit of effort, you too will soon become an authority in your area of interest.
#3. Increase your self-confidence
The more and more involved you become with blogging, the more your creative juices is going to flow. That’s one of the reasons why blogging is very popular.
As you gain knowledge about your topic matter, the confidence you will build in your followers and most especially, in yourself, will definitely soar. All of this will leads to increased creativity. You should keep an open mind and enjoy your new found confidence in your own self and abilities.
#4. Make friends and have fun
With a little effort and practice, you can easily build your base of followers and fans. As you become well known as an expert in your niche, you can encourage, inspire and help your followers make a great difference in their own lives.
Along with your blogging journey, you are going to make new friends and connections throughout the universe. If you are someone who like to travel, that means a lot of couches are very much available for you to snooze on while you are winging your way around the globe.
#5. Make money from your blog
Blogging may well be your passion but you can also make money from your blog. In fact, many authority bloggers are known to earn a living from their blog.
There are so many ways to earn money blogging. For instance you can make at least $2k monthly on Facebook.. You can display ads and receive commission from companies or individual by promoting their products and services on your blog.
Or you can sell your own digital products and services. For instance if you need a web designer, digital marketer, content manager you can contact Akeentech he’s an expert in that area.
The most common questions
#1.Question: How can you create your own blog for free?
There are many blogging platforms that enable you to create your own blog for free. All you need to do is to choose the one you prefer, register an account with them and start blogging. For example, you can set up a free blog on Tumblr, Blogger or WordPress in a matter of a few minutes.
But you have to understand a few things:
- Your free blog name is going be in this form: “blogname.wordpress.com” or “blogname.tumblr.com” or “blogname.blogspot.com”. In the blogging arena, this kind of blog is the sign of an inexperienced newbie who won’t be likely taken seriously.
- You will be subject to restrictions and rules set by the platform. They may prohibit or limit you to use your ads, or they may even display their own ads on your blog. If you are very serious about blogging, you will want to move away from this type of blog as soon as possible.
To begin your new blog or site the right way, we strongly suggest you set up a self-hosted blog with Blogger or WordPress and we are going to cover how to in this beginner’s guide.
If for some reason the free blog is the only option for you right now. You can then create an account on one of those platforms mentioned above and then check them out. Though, we are going to teach you how to create your own blog using blogger later on.
Question 2: Do bloggers make money?
You can surely make money blogging. However the amount of money will depend on so many factors and that won’t happen overnight however if you put enough effort you should be making extra income or even make a living from your own blog.
When you are just starting out, do not get disappointed if blogging will not buy you a new cloth, shoes, car or house in the first few months or years. If your blog is new, you will need to work hard before you start earning decent money.
#1. Step: Select a perfect niche
To become a successful and great blogger you will need to choose the right niche and work on gaining the highest form of knowledge within that topic or niche.
So choose the one that appeals to you—the one you know you are most interested in and passionate about. Strive for happiness, success, and recognition.
By picking the niche of interest and having your own particular point of view you are going to be able to differentiate your blog from other blogs.
Make a list of your hobbies or interests. Which topics fascinate you most? List them all, for example: cricket, fishing, playing games, yoga, tech or cooking.
During the course of doing this exercise, you’ll get a better feeling for the topics that most resonate with you. The best candidates for your niche are the ones you are most passionate about.
#2. Step: Choose a blogging platform
At this very stage, you will have to look at the best blog websites out there. And you can then determine the type of blog management tool you would like to use for your own blog.
We strongly recommend that you start your blog with a self-hosted setup that we’ll show in this guide. However, before you make any decision, let us describe each option for you.
When it comes to blogging platforms the following options are available: self-hosted, freemium and free.
Free platforms
These are the top management platforms in the United States as at May 2018.
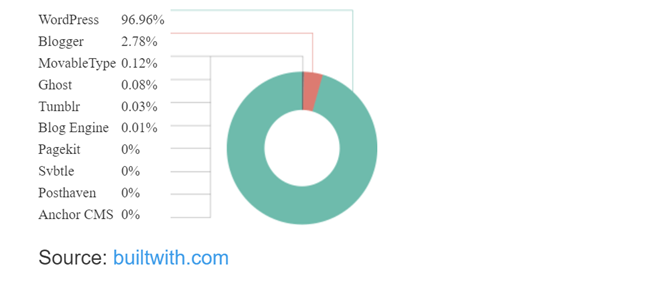
For many newbie bloggers, the availability of free tools such as WordPress, Blogger or Tumblr is very tempting. Of course, there is one big benefit, they are free.
By keeping your blog on a free blog platform, you allow the platform own your name. You will be subject to restrictions and rules set by the platform.
They may prohibit or limit you to use your ads, or they may even display their own ads on your blog. If you are very serious about blogging, you will want to move away from this type of blog as soon as possible.
Freemium platforms
Freemium means you will have a trial period before you will be required to start paying (costs vary from $10 to $50 per month). Many platforms are available.
One of the most popular one is TypePad. This platform is focus on ease of use for writing, however customization options are very limited and it lacks some certain features of value to bloggers.
By default, your TypePad name is going to look like this: yourname.typepad.com. It’s not always the best choice if you are trying to build the brand and name for your site. But you could point your own domain to a TypePad blog later on.
Self-hosted platforms
Self-hosted platforms enable you to run a blog using your own registered domain. Aside from following your web hosting and domain registrar company’s rules, you are totally in charge of your blog and your blog contents.
You have a number of options when it comes to self-hosted systems (also known as CMS Content Management System). The most well known is WordPress.org.
This option is called self-hosted since you will use your own web hosting name and space. It normally costs $5 to $10 per month for the web space (hosting account).
This also depends on the company you choose, and also $12 to $15 per year for the domain name. The actual CMS is usually free and open-source.
Although I mentioned some free blog hosting options, the best course of action is to own and control your blog, especially if you are going to be using your own copyrighted material (drawings, articles, photos, etc.).
Pay a small amount of money each month, about the same as little as a Starbucks coffee, and you’ll build your own equity. If you plan to sell products, services, videos, music or anything else through your blog, then that’s the best way to go. Many hosting providers will help you maintain an e-commerce site.
#3. Step: Pick a domain name
Your domain name is the name by which you will be known with online, regardless what niche you choose. It is your unique address on the Internet. Your domain will be all yours as long as you are paying the annual fee (Buy a .com domain or higher extension for as low as $0.88).
Users or readers who know your URL/domain can just type it into their web browser’s address bar. Others will be able to find you through search engines such as Yahoo, Ask.com, Google or Bing, so you definitely have to find a unique moniker.
Your blog domain name may be the very popular “dot com” or it may be niche or country specific. From .us to .co.uk (United Kingdom) and from .guru (for life coaches) to .info to .sport (for sports related domains).
These TLDs (top level domains) are added to any domain name so as to point to their location. The general rule is to go for a “.com” domain, but some of the other extensions can also work. For example “.net” or “dot info.”
You can read how to pick a nice domain name. In the end, it’s just about being memorable, so if a different country code or extension helps you be memorable, what else? Break the rules.
#4. Step: Get a web hosting account
After choosing your domain name, selecting reliable hosting provider services will also be one of the most important decisions to make. To some extent, the performance and functionality of your site will depend on your blog hosting provider.
The web host ensures your blog or site is available 24/7 to potential visitors or readers and that’s where your files and records are stored online.
Some of hosting companies likewise offer domain registration services. Some people including me keep their domain name with the domain registrar company, separate from the hosting account. I recommend keeping them separate because you won’t lose everything in case you have problem with any of them.
The wrong web host can cause several problems with your blog. Just imagine you choose a mobile company which has no reception. Your web host is a major part of the puzzle to maintaining a successful blogging career; therefore, it’s very crucial that you choose a reliable host provider.
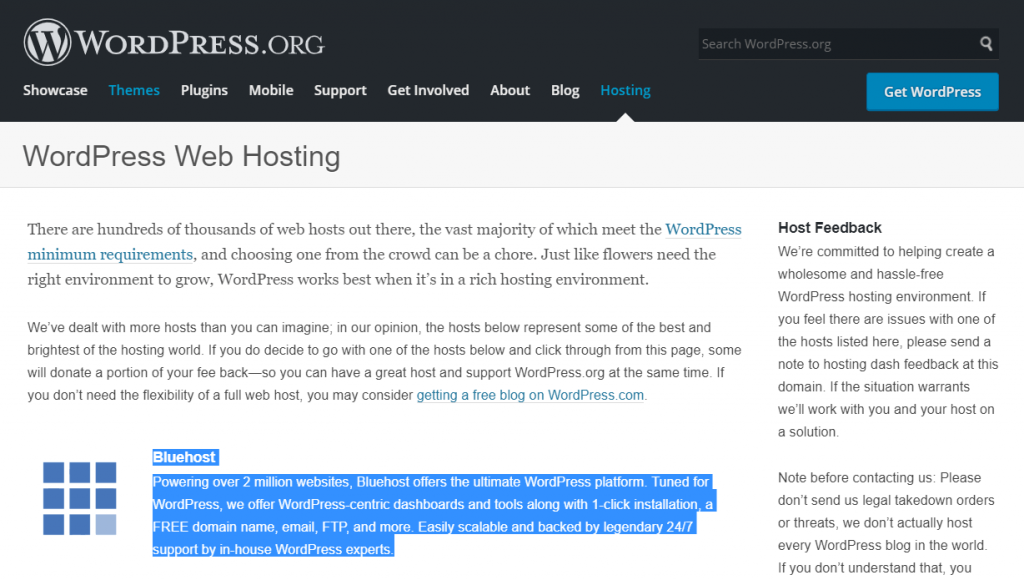
Based on our survey, Bluehost is a reliable provider. It is recommended 99% by WordPress.org and blogging experts and named it as one “of the brightest and best of the hosting world”.
Step #5: Install blogging software and set up a blog
This section provides you with detailed information to enable you sign-up for the web hosting account and set up a WordPress content management system (CMS). As an example, we are going to show you how to create your own blog with Bluehost and we also included screenshots of the pages that you have to go through. If you decide to go with any other web hosting provider the process may be slightly different but most of the steps should be similar.
Step by step blog set up instructions
Step #One
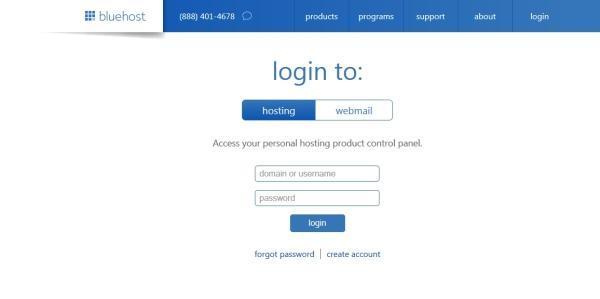
Use this link to visit Bluehost. Then you click the “Get Started Now button” button.

Step #Two
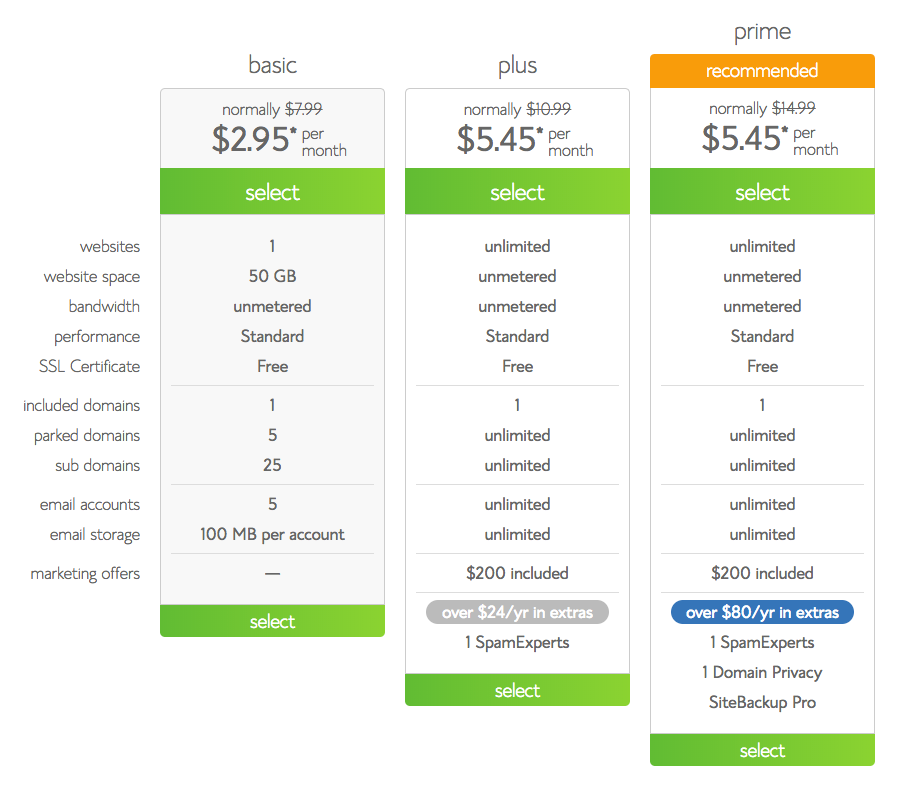
You should get started by selecting your plan. And if this is your very first time, you can go with the basic one – at least until your options are explored. The plan called “plus” should be able to cover all of your needs once you get moving, and you can consider the pro-version once your popularity skyrockets.
Step #Three
Your domain name has a very important say when it comes to the success of your blogging career, so you have to take your time to choose something new. Simply type in your desired domain in the “new domain” box and BlueHost will display whether it’s available or not. If it’s not available, it will show you a list of similar names you can choose from.

Step #Four
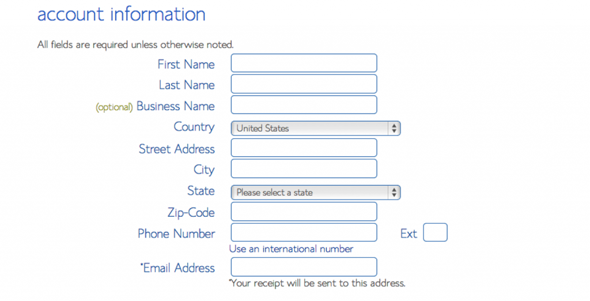
After you’ve chosen your domain name, BlueHost will direct you to the registration page where you will be required to fill in your personal information including the billing data. You only need a couple of minutes here.
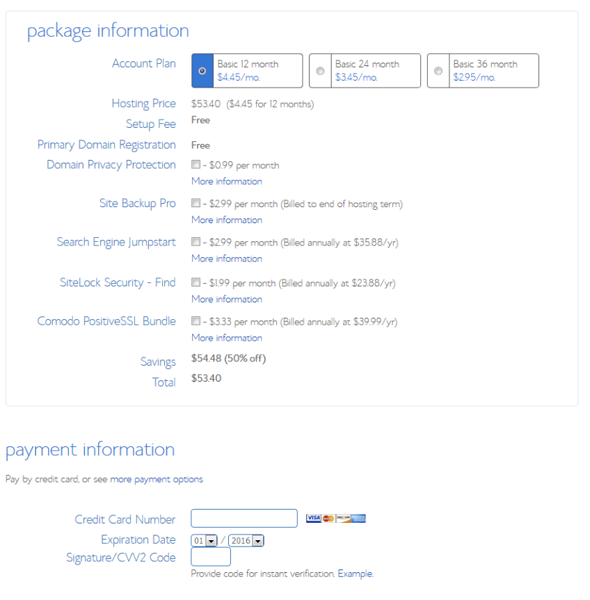
Step #Five
Pay extra attention to your hosting plan options. Obviously, the first 12 months package has the lowest price; however the other two are great if you want to make a long-term investment. You are free to unchecked the rest of the boxes – you can get them later if you find them necessary.
Step #Six
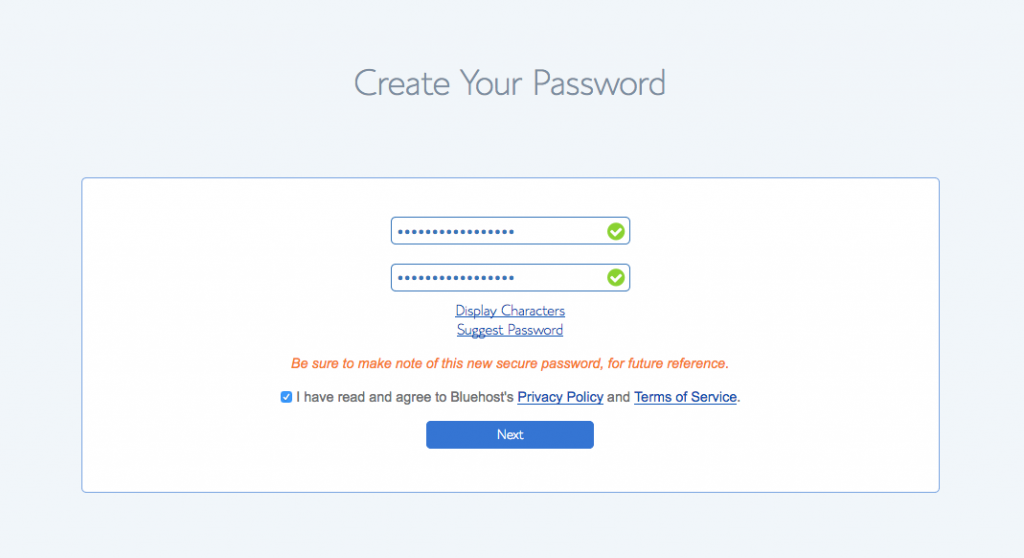
After you’ve entered your payment info, you are ready to set your password which you will be used for your account verification purposes. Choose a strong password containing alphanumeric, upper and lower case with special characters.
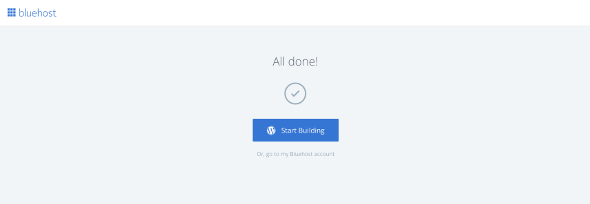
Step #Seven
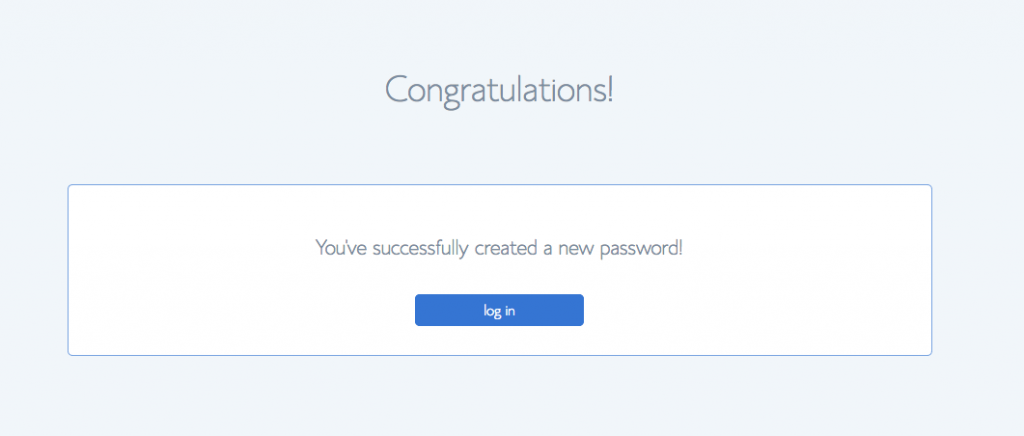
After you’ve successfully created your new password you should be able to login to your account. After clicking next you will get a congratulations message.
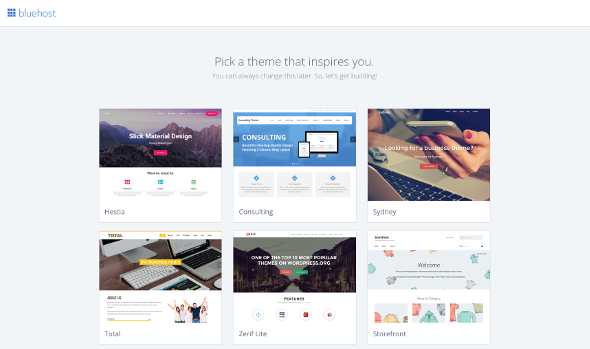
Step #Eight
When you login to your account, you will now be able to choose one of the default WP themes, provided by Bluehost. Remember you can always pick any other theme from a WordPress.org repository.
Step #Nine
After selecting a theme of your choice you can now be ready to log in into your WordPress dashboard.
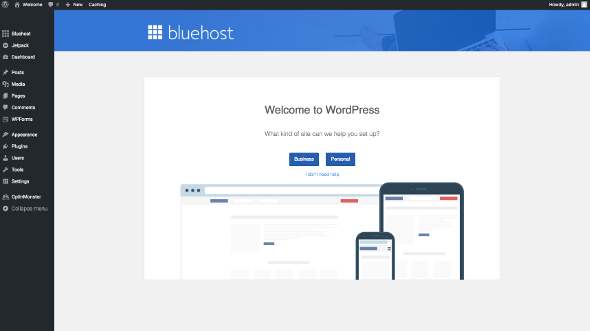
Step #Ten
Once you login into your WP dashboard you’ll be prompted with the “Welcome” message then you can decide to accept the help offered by BlueHost for selecting the type of site you are about to create. Or, you can decide to do it on your own.
Step #Eleven
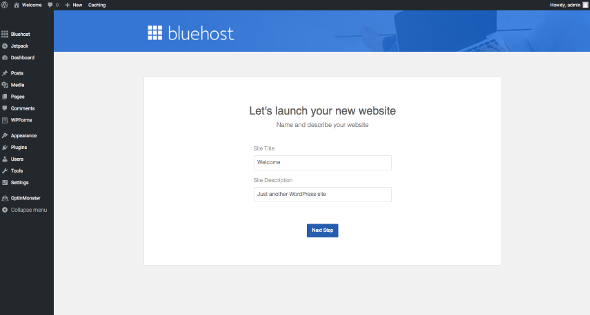
When you click the Bluehost button in the left hand corner, you are going to see the page with different tools which are designed to help you create your own blog. You can launch your blog easily by clicking the “Launch” button and you’ll be seen online within minutes.
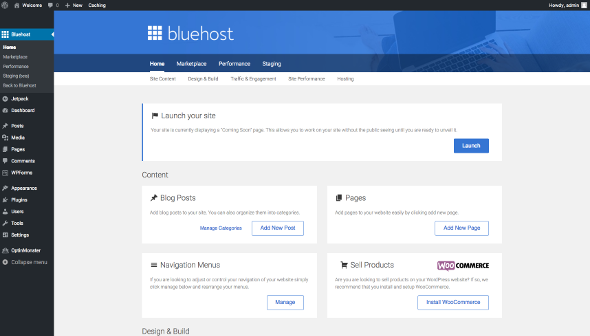
After you clicked the “Launch” button, you will simply need to fill the two most important fields for your blog. The blog title and blog description which will tell your future visitors or readers what your site is all about.
Now your new blog is ready for launch!
If you don’t have the time to do it by yourself and you would want us to create your own blog for only a dime, then click here for more details.
#6. Step: Find the right theme (blog design)
The very first thing your blog’s front-end needs is a design and layout. You’ll want to create an environment for your blog that is both practical and eye-catching.
In the long run, you’ll want your readers/visitors to easily find information on your blog. You don’t want readers/visitors to be discouraged by the non-intuitive or the colors you choose and unpractical way in which your information is showed. Your design can cause instant acceptance or instant distrust of your blog.
Start your search for your blog theme as soon as your WordPress(WP) platform is installed. The feel and look of your blog rely on the theme you choose for it.
Your visitors will first notice the overall appearance of your blog, before even taking a look at your content. Select a theme that looks great, but likewise works for your unique content needs.
Twenty Eighteen is the default theme that comes with your WordPress blog—while it’s a great starter theme, you will want to select a theme that is compatible and unique with your niche.
#7. Step: Write blog content
The next step is to find out what content you have to make for your new site/blog and the best practices you need to follow. The content of your blog/site will be the bait that attracts your visitors or readers.
Without great content, even the most well designed, tightly structured blogs will fail ultimately. There are two blocks you have to worry about, that’s pre-launch contents and post-launch contents:
Pre-launch content
Before you begin writing your daily blog posts, you will want to ensure your static pages (such as Contact, About us, etc.) and other parts of your blog (Footer, Sidebar, etc.) are filled with the suitable info. Let us explore each of these content parts.
- About us page: This is the most traditional page on any site or blog. This page tells new readers or visitors to your blog what your blog is all about, who you are and why you run a blog about that particular topic. Depending on your style and your niche, the information you provide can be personal, fun and or “all business”.
- Contact Us page: This is the page enable visitors of your blog to get in contact with you at any time. It can be a simple page with your phone number, email address and social network links, or you can likewise use a simple contact form that visitors will fill to communicate with you without leaving your blog or site.
- Sidebar content: The sidebar is the smaller column to the right or left (depending on the selected theme) of your site’s main content. In the sidebar, you can include your blog categories, ads, most popular posts, etc.
- SEO meta tags: You will have to prepare content for your SEO titles and description tagsof each blog page (not seen on the actual page however you need to have it ready).
Post-launch content
- Blog posts: The blog post is an article (entry) that you write on your blog. It could include content in the form of text, infographics, photos or videos.
- Cornerstone content: Cornerstone or evergreen content continues to be relevant to the readers and gives them extra value years after it’s publish date. It is frequently fresh and up to date. It remains informative and also retains its original and unique quality. As its name implies – it is a timeless piece.
How To Create A FREE Blogger Blog
An Introduction To Blogger.com
Blogger.com is a Google’s very own free blogging platform or site where you can create your own blog for free with the .blogspot.com subdomain (for instance, yourblogname.blogspot.com) or you can also buy a domain (recommended) to have your perfect blog or website (for example, www.yourblogname.com).
Advantages of creating your own blog on Blogger.com
- Starting a blog on Blogger.com platform is free and very easy to launch.
- Google owned the platform, so you have that credibility and trust.
- Though there are several free blogging platforms like WordPress.com, Tumblr, Weebly, com is the winner of all of them when it comes to giving you the features offered and freedom.
- You can monetize your site blog with Google AdSense and any other programs like affiliate marketing easily with blogger.com unlike other platforms.
Now let’s see how you can create your own blog with our step-by-step guide below.
Step By Step Guide To Create Your Own Blog On Blogger For Free
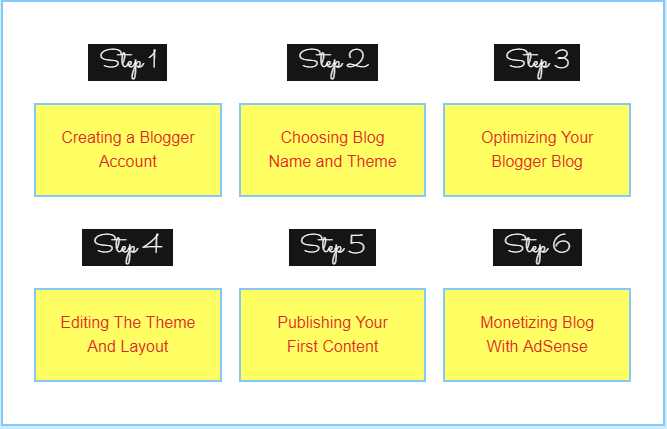
STEP #1:
Creating A Blogger Account
To get started, visit Blogger.com, and you will be shown with this beautiful landing page which prompts you to create your free blog.

Since blogger.com is a product by Google, to start using Blogger, simply sign in with your Google Account. (If you use Gmail, Hangout, Google Groups, Google+, YouTube, or Google Drive you already have an account.) If you don’t have an account with Google yet, you can sign up for one here.
After you sign in, you are going to be asked to use blogger as your default Google plus profile or if you would like to continue with a limited blogger.com blog profile.
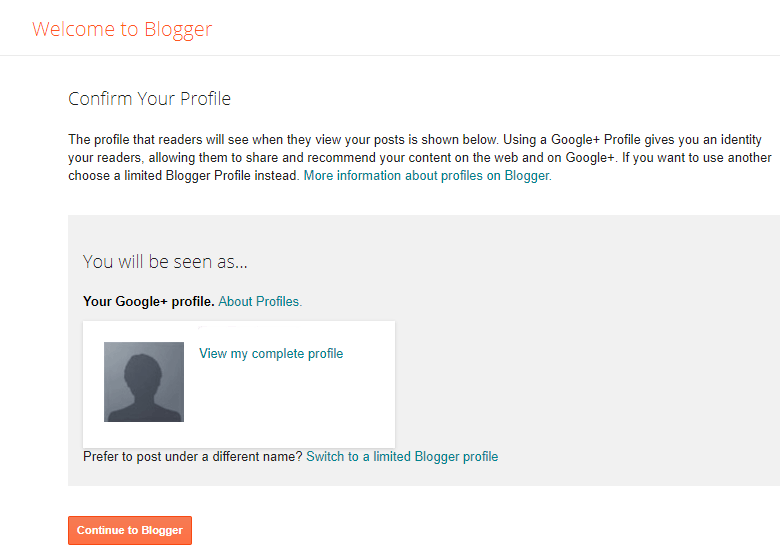
I will advise you choose the former because of the added benefits like connecting your site or blog with your Google+ social profile.
On the following screen, click on “Create your blog” button once more to launch your first blog.
STEP #2:
Choosing A Blog Name And A Blog Theme
In the next screen, you have to select a domain name for your blog.
In case you don’t know what domain name is, is an address by which people all over the world can access your blog or website.
It is like your physical home or office address people would have to reach out to you at your home or office.
Choose a domain name that is relevant to your site or blog topic.
Here is a guide on how to choose the best domain names for your blog.

Next, choose a suitable template/theme (decides how your blog will look on the front-end) for your blog and then finally click on “Create blog!” button. (Don’t worry you can change or customize these later.)
STEP #3:
Optimizing Your Blogger Blog
After you created your blog, it’s time to optimize your blog for better user experience and more search engine visibility.
This is a one-time process. You can access it on the left hand side panel.
Simply click on the option that reads “Settings,” and you can then optimize your blog as below:
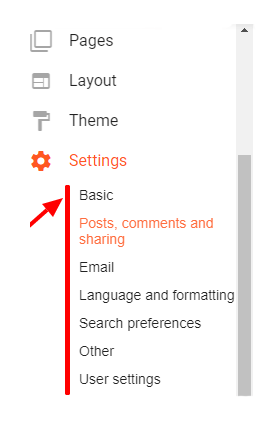
#1. Adding a description to your blog
Adding a description to your blogger blog helps visitors, readers and search engines know what your blog is all about. You can set it by clicking the basic settings option from the main “settings panel.”

#2. Optimizing your post section of the blogger blog
This section will optimize your blog homepage and how things look like in your single post settings.
Those settings are self-explanatory, and if you have any difficulty, you can then click on the help symbol (the question mark symbol) to resolve the issues.
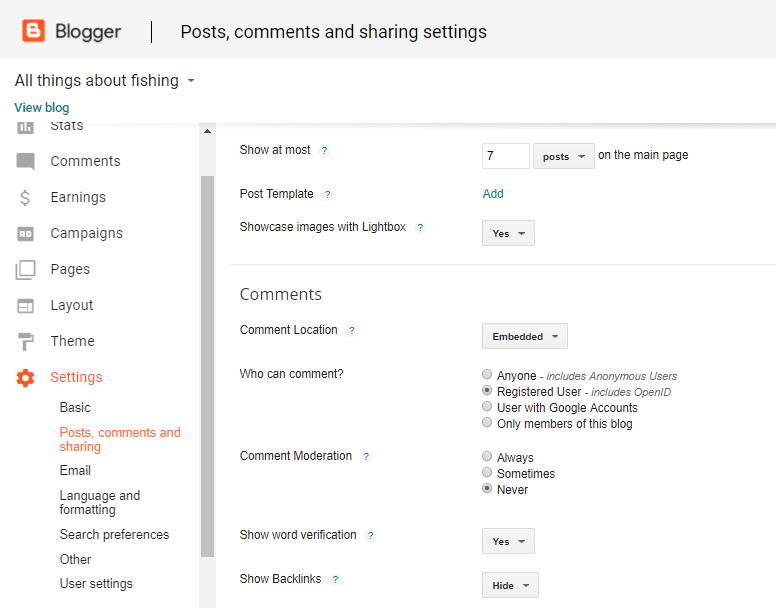
#3. Optimizing your blog for SEO
In this section, you are going to optimize your blog for search engines.
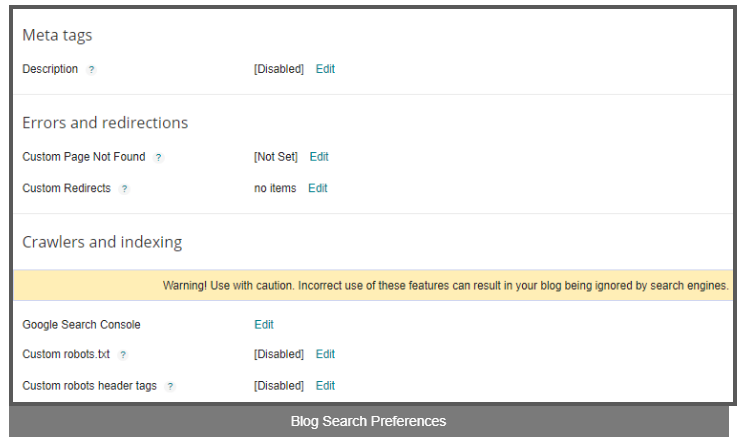
- Meta tags: Here you will write a great summary about your blog here. This will show up on search engines and will attract visitors to your blog.
- Custom page not found: When people land on your site via a URL that no longer exists, you can set a message to them that the page does not exist. You can set any HTML message or custom text instructing them what to do next.
- Custom redirects: If someone links to any of your pages, posts or they link to a wrong URL that doesn’t exist and you happen to delete that page, you can use this custom redirects option to redirect all such backlinks to a single page. Ideally, this page should be your homepage URL here.
The next section is something I would like to advise you not to mess with.
STEP #4:
Editing The Theme And Layout
Now, in this section, we are going to edit the layout of our blogger theme or template.
Blogger platform already has varieties of free templates that are basic and very simple. However, if you would like to go for a different blogger template you can download it from a simple Google search.
However, for the sake of this tutorial, we will go with the default blogger theme template.
#1. Adding a logo
A logo is what identifies and defines your brand. Blogger.com likewise enables you to set a custom logo for your blog.
Since you are just getting started you don’t have to get an expensive logo design. You can create a simple logo on your own using a free tool like Photoshop, CorelDraw
After that, you can then go to the layout option and then select “edit” link in the header box.
It prompts you different options to set a logo, then choose a custom image to upload the logo you designed.

Blogger Layout Settings
#2. Removing the navbar
The navbar: This is an unpleasant navigation bar at the top of your every page it has links to log out and visit other blogs.
I recommend you remove this because it looks ugly and unpleasant; also it gets your reader or visitors to go to the other blogs through the next blog link.
To remove it, click on edit link on the box which reads navbar and in the following popup window, turn it off.
#3. Adding a custom gadget
Gadgets are tiny pre-made code snippets that enable you add different functionality on your blog.
You can use those to add a search option, social media buttons, visitor stats, contact form, a custom menu or literally anything through custom HTML.
If you want to add a custom gadget to blogger blog, when you select the “layout” option, you will see small hyperlinks that read “add a gadget.” By clicking on those add a gadget will open default blogger gadgets, and you can then choose which gadget to add.
With this, you have already set up a professional blog for free on Blogger.com platform. What you need to do next is to write pages and posts that drive traffic to your blog.
STEP #5:
Publishing Content
In case you are confused, pages and posts are somehow the same except for the fact that pages are normally constant data that rarely gets updated or changed.
This implies that you can use pages to create your privacy policy, Contact us, disclaimer page and about page, and any other information that usually remains constant.
Remember
On blogger platform, you can create unlimited posts (articles) and only 20 pages. So you have to use your pages wisely.
#1. Creating an about us page for your blog
The about us page is going to be the most visited page of your blog probably because every reader or visitors that comes would like to check out who you are, what they can expect from your blog and what your mission is.
Writing your about page is very simple, you just have to give an introduction to yourself.
After that, you can talk a little bit about your blog and what topics the visitors or readers can expect from your blog.
If you are providing any services or you are open for any business deals, it is likewise good to mention those on about us page and have them linked to separate pages you will create for them.
Lastly, don’t forget to add your social channels like Twitter handle, LinkedIn or facebook page or profile to get them to follow you there.
#2. Writing your privacy policy and disclaimer page
Disclaimer pages and privacy policy add legal clarifications as to how your website uses your reader or visitor data and to what factors you are liable to your reader and what not.
They are important pages that you have to create before you launch your blog publicly or before applying for any monetization programs like affiliate or AdSense.
Now don’t worry, there is nothing to be scared. These pages can be easily generated or created without much technical knowledge.
#3. Writing your first post
Now it is time to write articles or posts that you want people to read on your blog.
These can be keywords that you want to rank for or topics that you have expertise in when people search for them on Google.
To write an article or a post, go to your blogger dashboard and then select the option “New Post.”
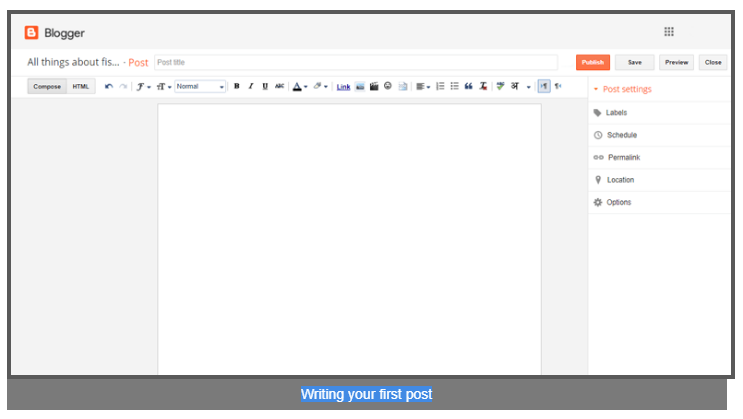
You will now land on an editor environment where you can write your first blog post, give your post a title, add images to it and you can even add hyperlinks to other pages and posts and pages on your blog or reference articles from other websites.
The editing concept is very similar to that you do in Google doc or an MS Word, so it is not going to be hard for you.
I recommend you write at least 5 posts before you launch your blog publicly or sharing it with friends and others.
Having a decent number of blog article or posts will give enough idea to your readers or visitors about what your blog will be like and what they can expect from your blog.
Setup BlogSpot With your Custom Domain Name:
When you create a blog on BlogSpot.com platform, you usually get a domain name like (yourname.blogspot.com) and this is what is called a free domain name. Whereas custom domain name is something like yourname.com. A good example is akeentech.com which is a custom domain name.
There are countless benefits of using a custom name for your Blogger blog instead of free domain name,
Now, setting up the custom domain feature in blogger.com is a bit of technical part, however this do it yourself (DIY) guide is targeted to non-technical people.
Here we’re going teach the complete step by step guide which you can follow to setup a BlogSpot custom domain to your blogger.com blog.
In this case, I’m assuming you have purchased your domain name from GoDaddy and you have direct access to your BlogSpot blog dashboard.
The very first thing which you have to do is to purchase a custom domain name, which will usually cost around $12 for one year. The advantages you will get with a custom domain name are going to worth your investment on domain name.
Moreover, think about what looks much better: akeentech.blogspot.com or akeentech.com.
If you have never bought a domain name before, here are guides which will enable you to select the right domain name for your blog.
I advise you to read it, and decide the name of domain which you want to purchase. I highly recommend you to buy .com domains instead of any other (.net, .info, .org). In 2018, you can also consider buying new domain name extensions with .guru .club or .video.
After you have decided upon the domain name you would like to purchase, visit GoDaddy and purchase your domain. (5 minutes work).
Now, I assume you have two things with you:
- Your Bloggert blog up and running
- You have access to your domain name registrar dashboard
We have to make changes at two places, and once you have setup the custom domain feature of BlogSpot platform, Google will take care of all your traffic migration and you will not lose any backlinks Or traffic
Add your Register domain name to your BlogSpot.com Blog:
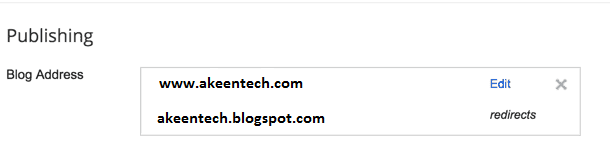
This is the first stage where you will add your registered domain name to your blog. Simply sign in to your BlogSpot.com dashboard, and then go to Settingsà Basics and you are going to see an option which says Publishing àBlog address à + Setup a 3rd party URL for your blog:
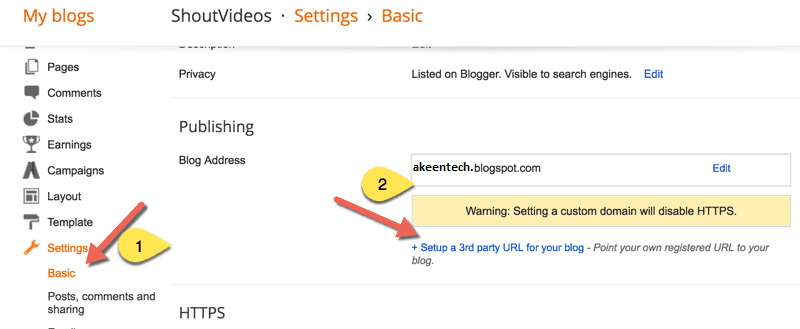
Here you have to add your domain name that you have purchased, then after adding the domain name, it’s going to give two CNAME records and 4 A records which we are going to need in the next step.
Click on + Setup a 3rd party URL for your blog, and then add the domain name which you purchased.

Note: You have to add domain with www as prefix. (look at the screenshot above for better understanding)
Once you have added the domain name with www as prefix, you’re going to see an error which reads “We have not been able to verify your authority to this domain. Error 12.” and you will get the CNAME record that you have to configure (See screenshot below)

Once you have these CNAME details, now you need to login to your domain control panel, and then make changes.
Now, follow the next step in this guide and your Blogger custom domain name setup will be ready in no-time.
Setting up CNAME and A Record for Blogger Custom-Domain Name
Sign in to your Godady account dashboard and click on manage domains. You will see a screen like this below:
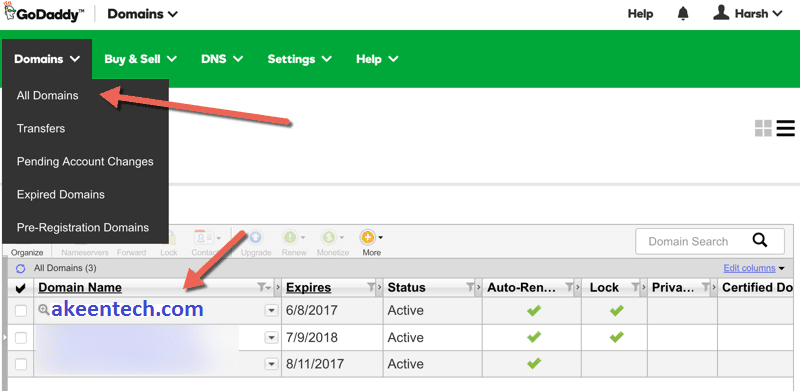
Click on the domain name which you purchased inside your Godaddy dashboard, and you will land on Manage domain page.
On the next page, click on DNS zone file to begin adding the record.(See the below screenshot for the reference)
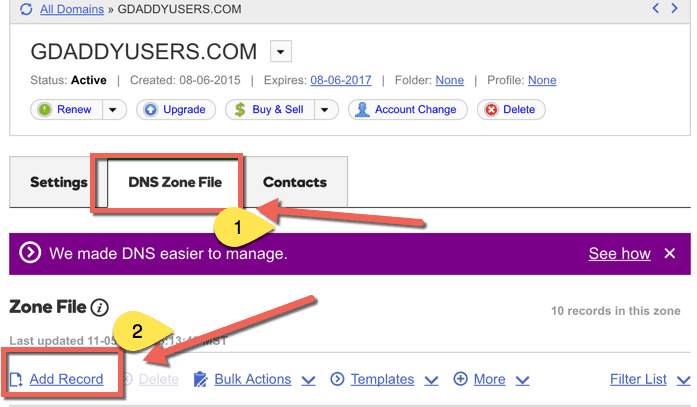
Click on Add record and from the pop up select CNAME record and add both the record one after the other from your BlogSpot setting screen. Here is both the image to make it easier for you to understand the setup.

Click on Add another and then copy the second CNAME record from your BlogSpot page:

Adding 2nd CNAME record
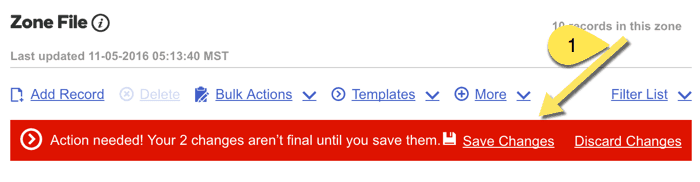
Click on finish and then on the next page you have to click on Save changes.
In case if you don’t understand, feel free to ask me for help in the comments.
Adding A records to your Domain DNS
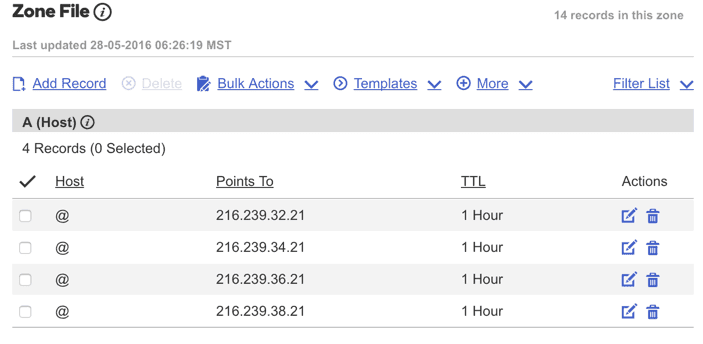
This is the final stage where you simply have to add 4 I.P. Addresses into your A record. The process is going to be the same as above, all you have to do is to add A record instead of CNAME. I’m only going to share a single screenshot which will show you how to add A record, and likewise you can add all 4 A records.
Click on Add record, and then select A name under record type. In the Hostname part add @ and on Destination IPv4 address add 216.239.34.21

Like this you need to have total 4 A records and your final screen for A record will look like this. Below are the I.P. addresses of 4 A records which you have to add.
216.239.32.21
216.239.34.21
216.239.36.21
216.239.38.21
Below is the final screenshot of my A record page on GoDaddy
Now once you have setup CNAME and A record, you have to wait for like 5 minutes to 4 hours for these changes to take effect globally. You have to go back to your Blogger dashboard, and then click on save changes.
If the CNAME and A record has been updated globally, this time instead of it to display error “We have not been able to verify your authority to this domain. Error 12.“, now your custom domain will start working. In my case, in some cases it may not be more than 5 minutes for these changes to take effect globally.
If the error displays that means, you have to wait for some more hours for the custom domain name to be updated. So, here is the final screenshot which you will see:
Once it’s has been added, Google will take care of redirection part, and if anyone opens your BlogSpot.com blog address, he/she will be redirected automatically to your new custom domain name.
This will likewise work seamlessly for internal pages, and you will not lose any link-juice or traffic.
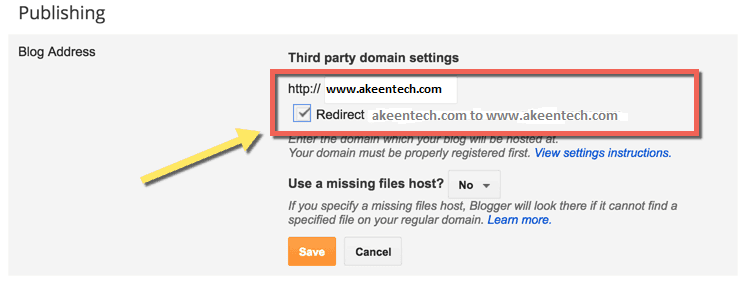
One last thing:
Also, you have to click on Edit here, and redirect non-www version of your domain to www. Just click on Edit and mark the options which says “Redirect xxxx.com to www.xxxx.com”
The whole process might look technical, however once you are inside the dashboard and follow all the steps as mentioned above, it will be very easier for you to implement.
If you have been blogging on BlogSpot.com platform for long time or for a while and you are not using BlogSpot custom domain feature, I highly advised you to start using it to make your blog to look more professional and for better branding.
STEP #6:
Monetizing Your Blog With Google AdSense
This guide on starting a free blog would definitely be incomplete without a tutorial on how to monetize your Blog blog.
Here is how to monetize your blogger blog with Google Adsense.
Please Note: There are numerous ways with which you can make money through your blog like selling products, providing services, affiliate marketing, etc. however they are beyond the scope of this article.
When you have at least a good number of blog articles or posts and a good readership, you can surely use Google AdSense to make money from your Blogspot blog.
You can easily apply for Google AdSense from your blogger dashboard and get approval. Read Adsense approval within 3 days
To apply for Google AdSense via blogger blog, go to your dashboard, then click on “Earnings” and click on apply for AdSense.
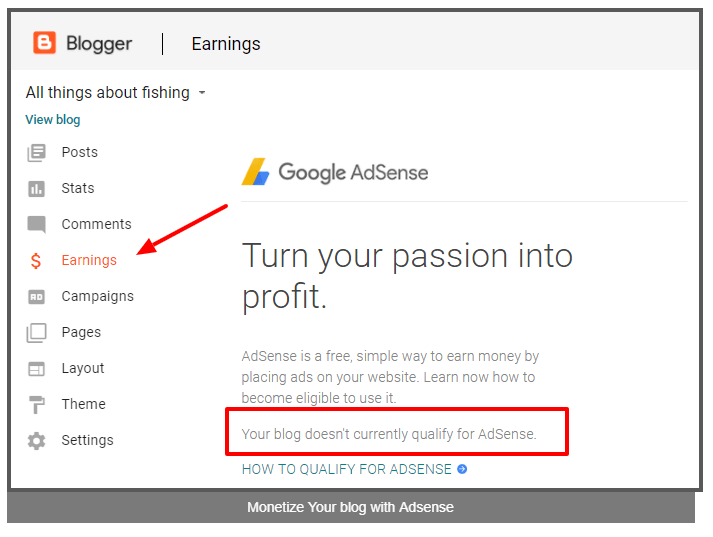
Since this is a demo blog for the purpose of this guide, it is not yet eligible for AdSense.
But, when you have all the necessary pages and a decent blog posts, you can get approval successfully.
After this, you can migrate your blogger.com blog anytime to the self-hosted like WordPress blogs to have more control over your blog and even get more potential for its growth and development.
Wrapping Up:
So, with this, you now completed your crash course to create your own blog on WordPress and Blogger.com platforms.
If you are stuck anywhere in the process of creating your own blog and you need some help, feel free to let me know in the comments. If you really enjoyed reading this tutorial and find it useful, do share it on Twitter, Facebook and Google plus.
I hope you start your own free blog using those platforms, gain first-hand experience in blogging and earn decent money for your financial freedom.
Method To Make At Least $5K Per Month From Facebook -
November 2, 2018[…] My website monetizes with Facebook instant articles. You can run a simple site made by WordPress or Blogger platform. Site host on a quality hosting server. I have over 50GB shared hosting for my blog with unlimited […]
baju gamis pria
November 10, 2018Hi! This is my first visit to your blog! We are a group of
volunteers and starting a new project in a community in the
same niche. Your blog provided us useful information to work on. You have done a marvellous job!
baju gamis pria recently posted…baju gamis pria
BestChanel
November 12, 2018I have noticed you don’t monetize your site, don’t waste your
traffic, you can earn extra cash every month.
You can use the best adsense alternative for any type of website (they
approve all websites), for more details simply search in gooogle: boorfe’s tips monetize your website
BestChanel recently posted…BestChanel
Marketing Ideas to Steal From Your Competitors - !
November 19, 2018[…] a company who has written thousands number of blog posts for readers and clients, we have also altogether read tens of thousands more. Type any search query […]
Camila
November 30, 2018I love your blog. Really so helpful and informative post. I like this post. Thanks for the good post to sharing it with us.
Kevin
December 9, 2018Great article for all-around Blog startups – way to go!
Kevin
Kevin recently posted…Best Pressure Washer
Marketing Ideas To Steal From Your Competitors
December 10, 2018[…] a company who has written thousands number of blog posts for readers and clients, we have also altogether read tens of thousands more. Type any search […]
ValeriaBig
December 26, 2018Hello. I have checked your akeentech.com and i see you’ve got some
duplicate content so probably it is the reason that you don’t rank high in google.
But you can fix this issue fast. There is a tool that generates
articles like human, just search in google: miftolo’s tools
ValeriaBig recently posted…ValeriaBig
6 Website Designing Trends You should Not Ignore in 2019 -
January 4, 2019[…] HOW TO CREATE YOUR OWN BLOG USING WORDPRESS OR BLOGGER PLATFORM […]
adelaide weather
January 5, 2019Having read this I believed it was extremely enlightening.
I appreciate you finding the time and effort to put this article together.
I once again find myself personally spending a significant
amount of time both reading and commenting.
But so what, it was still worthwhile!
adelaide weather recently posted…adelaide weather
The Real Fact About Blogging as a Career - N01 Extraordinary Money Making & tech blog/website
February 11, 2019[…] Here’s how you can avoid this: start your blog with the end goal in mind. […]
7 Reasons You should Avoid a DIY Web Designing -
March 7, 2019[…] January 4, 2019January 4, 2019 admin […]
custom boxes
July 20, 2019I really thank you for the valuable info on this great subject and look forward to more great posts. Thanks a lot for enjoying this beauty article with me.